| Introduction | ||
| When I made the first set and second set of speakers, I wanted to make my own speaker grill covers. When I searched the web for instructions on how to make speaker grills, I was surprised at how little there is out there. The best I could find were this and this; both are good, and after some experimentation, I settled on the following method. | ||
| Cutting the Grill Frames | ||
| First, I laid the speaker cabinets face-down on a piece of 1/2" chipboard and marked the edges of the cabinet with a pencil. I adjusted the lines so that the frames would be about 1/32" thinner than the cabinet on each side (to allow for the fabric), and marked the top and bottom edges of the frames. | ||
| After cutting out the frame rectangles, I used a router to round off the outside edges of each frame. For the first set of speakers, I used a saw and cut a flat bevel on the edges. Both look fine, I'm not sure I have a preference. | ||
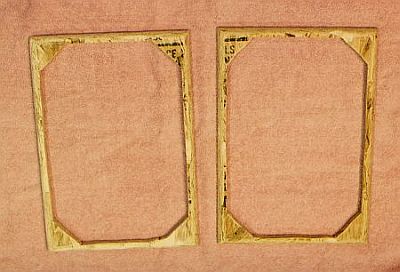
| Next, I cut out the inside of the frames with a saber saw leaving a 1/2" margin around the sides, with thicker corners to hold the grill-snaps. Actually, 1/2" is too thin, I would recommend leaving about 3/4" if possible so the frames aren't too flimsy. The cut frames are shown below. | ||
 |
||
| Now comes the critical step to make sure they fit properly on the speaker cabinets. First, measure and mark the spots for the plastic grill snap holes in the center of the corner areas on the frames. Try to be exact and consistent for each corner. Then, carefully place the frames on the fronts of the speaker cabinets so they are exactly where you want them. Clamp or hold them down so they cannot move, and drill the hole in each corner of the frame all the way through the frames and into the cabinets. Use a 1/4" bit that will act as a pilot hole for the larger bits used to drill the grill-snap holes in both the frames and the cabinets. Be careful to keep track of which frame goes with which speaker, and which way is up - depending on how exact your holes are, the frames may or may not be interchangeable. | ||
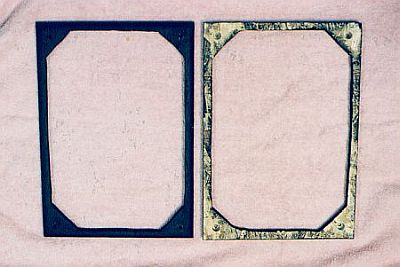
| Next I drilled the large holes in the frames for the plastic female grill snaps. Also, since I am using black grill cloth, I painted the fronts and sides of the frames with black paint, as shown below. | ||
 |
||
| Attaching the Grill Cloth | ||
| The next step is to attach the grill cloth. This is not as difficult as it looks, but you may want to practice with a small piece of cloth and scrap wood. Cut the cloth to be about 2" bigger than the frame all the way around. Line up the vertical and horizontal fabric lines in the cloth with the edges of the frames. Using a staple gun with 3/8" staples, staple the grill cloth to the middle of the top on the back side of the frame. Pull the cloth taught (but not too much, it doesn't have to be, and it shouldn't be, too tight) and staple it to the bottom of the frame. Do the same with the two sides. Don't worry if the staples bend or flatten, these first four are to hold things in place and you will likely remove them as you go along. | ||
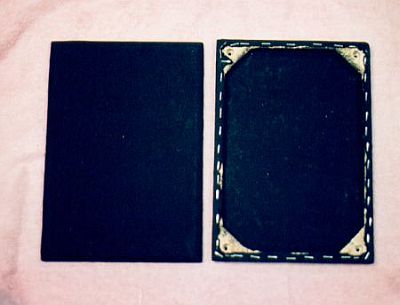
| Continue to staple the cloth up and down all four sides. Staples should have no more than about 1/4" between them. Be careful to keep it smooth without wrinkles or bunching. The tricky part is the corners. Carefully pull the material over the corner so there is no bunching and put a staple as close to the corner as you can covering as much of the bunched-up material as possible (see photo below). You must be careful to keep the staples and cloth away from the snap holes. Use small scissors to trim the cloth as close to the staples as you dare. Lastly, glue in the female grill snaps. | ||
 |
||
Back