| |
 |
| | | |
| |
Introduction |
|
| | | |
| |
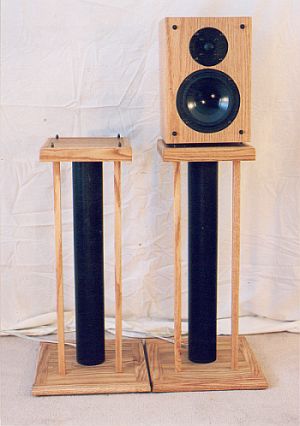
The AR.COM bookshelf speakers I made are rather small, and they need to be sitting on something to elevate them to the correct listening level. For a long time I had them on shelves in my living room on a bookcase-type wall unit, but I have always wanted to get proper stands to provide the correct dampening and grounding so the speakers could perform at their best. |
|
| | | |
| |
At about the same time that I was building these stands, I was also learning how to put together a proper listening enviromnent. The stands are an integral part of my listening room. |
|
| | | |
| |
The Theory of Speaker Stands |
|
| | | |
| |
The idea behind high-quality speaker stands is to provide a rock-solid platform that minimizes a speaker's vibration. As Newton pointed out with his third law, whenever a speaker cone moves forward, the rest of the speaker wants to move backward with equal momentum. Of course, because the speaker cabinet has much more mass than the cone, it moves back only a tiny bit, but the resulting vibration can supposedly take the edge off the music and degrade the sound. To minimize this movement, a speaker needs to be anchored to something heavy enough to keep the speaker stationary, and to absorb and dissipate the vibrational energy. A good stand provides such a platform by being very heavy and very rigid. Unfortunately, an all-wood construction is neither heavy, nor very rigid. Metal is the best material for this, because a one-piece, welded steel stand is about as heavy and rigid as you can get. |
|
| | | |
| |
Also, a good stand should not vibrate (resonate) with the music, because resonance reinforces and cancels certain frequencies, thus coloring the sound. To avoid resonance, a stand needs to be acoustically dead. This is typically accomplished by using sand filling. Sand is heavy, and the grains can rub against each other to dissipate vibrational energy as heat. Wood resonates easily compared to metal, although some say that metal tubes have their own resonance problems, and PVC is a better option. Several DIY speaker stand projects on the web are made entirely from PVC tubing. |
|
| | | |
| |
Stands are usually set on sharp, narrow, steel "spikes" that are imbedded into each corner of the stand's base to lift the stand off the carpet and anchor it to the solid floor with very small contact points. Often the speakers themselves are also set on spikes that are imbedded into the top of the stand to firmly connect the speaker to the stand. |
|
| | | |
| |
In summary, the idea here is to join the speaker to the Earth as solidly as possible to minimize cabinet movement, and to "drain off" the vibrational energy. |
|
| | | |
| |
Designing the Stands |
|
| | | |
| |
As a result, nearly all high-end commercial speaker stands are made of heavy, welded steel tubing, often filled with sand for dampening. While this design may provide the best performance, these kinds of stands tend to be expensive, ugly, and very hard to make yourself. |
|
| | | |
| |
I really wanted stands with a nice wood finish so they would look nice in the living room, but I also wanted the stands to maximize the sound quality. Since I lack the skills and equipment to do serious metalworking, I opted to go with wood bases and tops, and PVC supports. Basically, my design ended up being a combination of this one and another one (that is no longer posted). The design consists of oak veneered and trimmed tops and bases, with sand-filled PVC tubes for vertical support. The PVC support tubes are attached to the tops and bases with 1/4" threaded rods that can be cranked down tight to make the base/support tube/top assemblies as rigid as possible. |
|
| | | |
| |
I determined that the height of my ears when sitting on the couch is about 38", so I wanted the tweeters to be about 40" above the floor. I designed the stands to be 28" high, with about 1/2" more each for the top and bottom spikes. |
|
| | | |
| |
Building the Wood Pieces |
|
| | | |
| |
 |
| | | |
| |
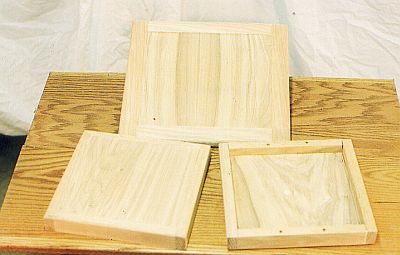
The tops and bases are constructed from 3/4" oak-veneered plywood edged with solid oak 1" x 2" trim. The trim pieces are glued to the plywood with 1/4" dowels. The bottoms are 14" square and have the edge pieces laid flat. The tops are 10" square and have the edge pieces on end to add a bit of thickness to the tops. The outside edges of all of the pieces were rounded off with a router. |
|
| | | |
| |
Making these pieces turned out to be much more difficult than I imaged. Because of the differential hardness between the plywood and the solid oak, and the fragile nature of the veneer, it was virtually impossible to sand the things flat. It looks OK, or at least some of it does, but if I had it to do over again, I wouldn't use the solid oak edging, I would use edge veneer on the plywood. |
|
| | | |
| |
Constructing the Supports |
|
| | | |
| |
 |
| | | |
| |
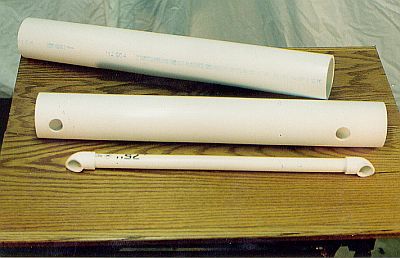
The supports are made from 3" schedule 40 PVC pipe. Because exposed speaker cables are ugly, I designed it so the cables can be routed from the base to the top inside the main supports of each stand, so they are kept out of sight. To do this, I took 20" long pieces of 3/4" PVC and glued 90 degree elbows on the ends, as shown in the above photo. I then shaped each of the right-angle portions to fit snuggly against the inside curve of the 3" PVC, and to make the 3/4" PVC pipe more or less flush along the inside of the supports. I cut 1" holes at the top and bottom of each support that line up with the angled ends of the smaller PVC, then glued the 3/4" PVC assemblies to the insides of the supports. |
|
| | | |
| |
The supports are aligned slightly behind the center of the tops and bottoms, so I also added two 3/4" square solid oak legs in front of, and to the outside of, each PVC support. The oak legs add a little wood accent, as well as support, to the stands. I attached the oak legs with 1/4" dowels in the ends that are glued to 1/4" holes in the tops and bottoms. |
|
| | | |
| |
Finishing the Wood Pieces |
|
| | | |
| |
To finish the wood portions, I hand sanded everything with 100, 150, and 220 grit sandpaper, then applied three coats of Watco Danish Oil. I tried to follow this guy's method, including saturating the wood in oil, wet-sanding with 320 and 600 grit paper, and allowing long drying times. I must admit, they look pretty nice, but I'm not sure the extra labor for sanding, and the extra time waiting for everything to dry repeatedly, is really worth it. |
|
| | | |
| |
I painted the PVC support pipes with two coats of a textured, flat-black spray paint so they look just like wrought-iron, metal tubes (yeah, right.) |
|
| | | |
| |
Installing the Spikes |
|
| |
 |
| |
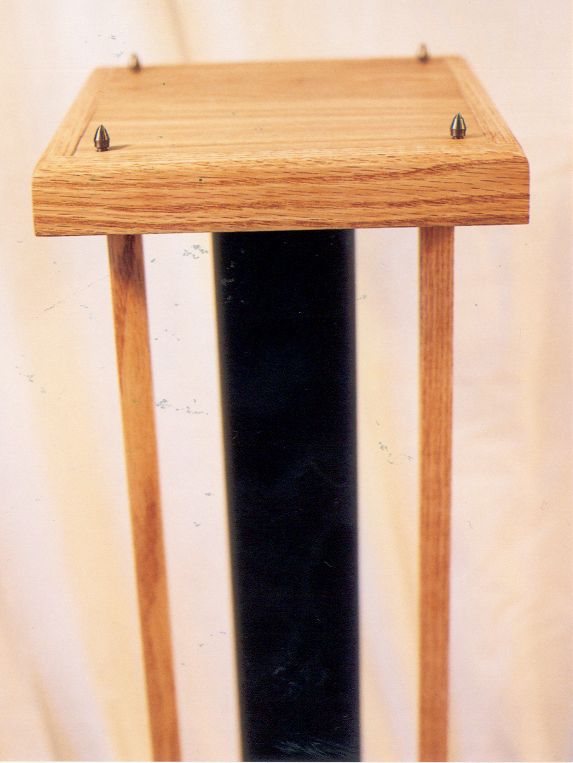
Next, the spikes are installed. You can buy Official Speaker Spikes from audiophile web sites for outrageous amounts of money if you want to, but one DIY trick for spikes is to get target points from an archery supply place. You can get target points for as little as $2.50 a dozen from online stores, but I opted for these classy carbon-black ones that cost a whopping $6.99 per dozen. I needed a total of 18 spikes for the two stands; four on each top, and five on each base. |
|
| | | |
| |
The spikes are composed of three sections: the thick, pointy-head part, the smooth middle shaft part, and the threaded end part. I drilled holes the length of the shaft and threaded parts at a diameter smaller than the threads, then used a tap and actually tapped screw threads into the wood itself. The solid oak edge pieces are hard enough to hold the threads. By tapping the wood, I can screw and unscrew the spikes to level the speakers and the stands. Next, I drilled a larger hole part way in to accommodate the middle shaft part. I then inserted spikes into each hole and screwed them in. |
|
| | | |
| |
 |
| | | |
| |
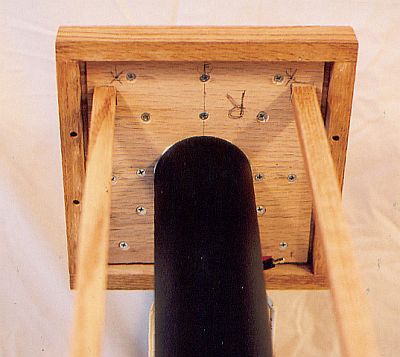
Although the holes were drilled and tapped for spikes in both the bases and the tops, only the base spikes, as shown in the above photo, were installed before assembly. I placed the bases with the spikes on a flat board, then screwed and unscrewed the spikes until the bases were solid (not tippy), and level. |
|
| | | |
| |
Putting the Stands Together |
|
| | | |
| |
 |
| | | |
| |
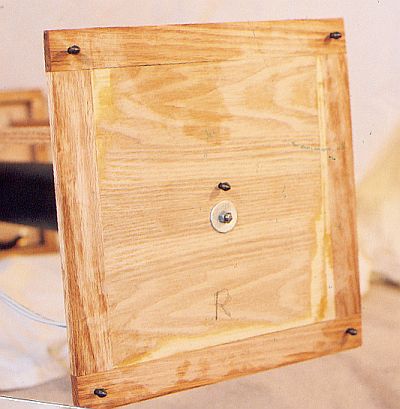
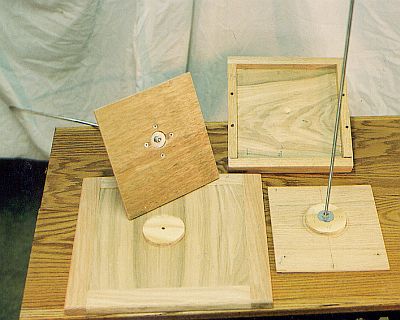
For simplicity, I will describe the assembly of one stand. To attach the PVC support to the top, a 3" diameter wooden puck is cut from 1/2" plywood and is screwed to a piece of 1/4" plywood that just fits on the underside of the top. The threaded rod is run through both the puck and the plywood and is secured with a large fender washer and nut on each side of the plywood/puck. To make the 1/4" plywood/puck/rod assembly fit flush with the bottom side of the top piece, a shallow hole is drilled in the bottom of the top piece to accommodate the nut at the end of the rod, and a larger, shallow hole is drilled into the top of the 1/4" plywood to accommodate the upper washer, as shown in the photo above. |
|
| | | |
| |
 |
| | | |
| |
The 1/4" plywood/puck/rod assembly is then screwed to the underside of the top, as shown above, with enough screws to make the connection as rigid as possible. The top is then placed face-down on a carpet and the PVC tube is placed over the rod and fitted over the puck (with the cable holes in back), along with a small amount of caulking to seal the connection. |
|
| | | |
| |
At this point, the PVC support tube is filled with sand. Another plywood puck is screwed to the top of the base, and holes drilled all the way though for the rod. The thin oak legs are attached to the tops with dowels and glue, then the base is placed over the rod with the puck inside the PVC tube, again with a little caulking to keep the sand in. The oak legs are fitted with dowels into holes in the bottom, and a fender washer and nut is put over the threaded rod. Before tightening the rod, the whole stand is laid on its side and the top and base rotated so they lay flat and are parallel, Then, the bottom end nut is cranked down tight to secure the PVC support very tightly against the top and base (making it tight is critical to make the stand rigid, but be careful; I'm sure you could over-tighten it and shatter the PVC support, or crack the wood, or do something equally catastrophic). The excess rod is then cut off with a hacksaw. |
|
| | | |
| |
 |
| | | |
| |
The last step is to install the spikes in the top. I placed a board on the four spikes and screwed the spikes in and out until the board sat firmly and level. |
|
| | | |
| |
Conclusion |
|
| | | |
| |
So, how do they work? Well, because the AR.COM speakers have very stout, solid, heavy cabinets, I doubted that they suffered from vibrational problems as much as more cheaply constructed commercial speakers would, so I fully expected the stands to make little or no difference in the sound. That was fine; I still needed decent looking stands to elevate them to the proper listening level in my living room. However, when I installed the stands and put on some music, I was utterly astounded at the difference! Just as others have described, the base tightened up to where I could differentiate individual base notes in certain passages where I couldn't before, and the imaging and clarity is much improved. These stands have made the biggest improvement in sound since I built the preamplifier and amplifier. I honestly did not expect that. What a treat! |
|
| | | |