| |
 |
| | | |
| |
Although I don't listen to the radio a lot, I do like to turn it on when I'm temporarily sick of all my CDs and records, or if I want to listen to something in particular (like A Prairie Home Companion, for instance). For several years I had been using a Yamaha T-300 analog tuner that I bought on eBay for $20. It worked alright, but living in the outskirts of Boston, it didn't get many stations well, so the sound quality was markedly inferior to my other sources. I wanted to upgrade so I would have a better tuner, but also so I'd have a new audio project to work on! |
|
| | | |
| |
I looked around the Internet (for example, the Tuner Information Center Web site) and found out that old ("vintage") tuners are typically of much better quality than newer ones, and that Sansui tuners, among others, are very highly regarded for their sound quality and their ability to pull in weak stations. I was thrilled to learn this because the first real stereo that I bought back in 1978 included a Sansui AU-317 integrated amplifier, and I always thought that the design of those components was totally cool, and I wanted the matching tuner (TU-317) so badly, but at $300, I just couldn't afford it ($300 was a heck of a lot back in 1978). I still have that amplifier, by the way, and I have used it continuously for 30 years. I recently restored it, and it still works great. A solid piece of work to say the least. |
|
| | | |
| |
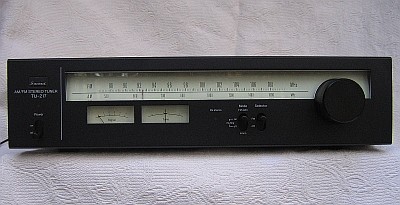
So, I watched eBay for a while and found that vintage Sansui tuners come up regularly, and in early April, 2007, I successfully snagged a TU-217 for $68 from a guy in Las Vegas. Yes, the TU-217 is the lowest end of the TU product line (there was the TU-217, 317, 417, 517, 717, and, I think, a 917), but it is still very well regarded. Supposedly, the electronics and sound quality are exactly the same in the 217, 317, and 417, and the differences are the exterior bells and whistles. I would have preferred a 317 (exactly the same as a 217 but with an illuminated dial), but they are very hard to find. The higher-end models of this series also show up on eBay, but typically sell for upwards of $450 or more. I just couldn't justify the cost. |
|
| | | |
| |
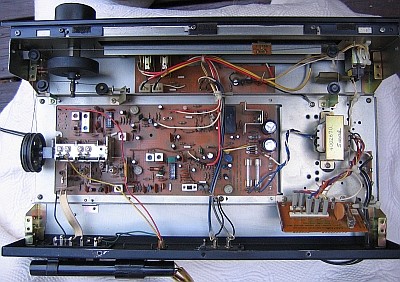
Once I got the unit and took off the cover, I realized that the restoration project was going to be mostly cleaning. There were patches of rust on parts of the frame and around some screw holes, and many of the screws were coated with a white corrosion product that looked like the stuff you see on your car's battery terminals. And, the whole thing inside was coated with a sticky residue of some kind that trapped the dust. Fortunately, the front panel was in good shape; only a few tiny scratches on the aluminum (easily fixed with a Sharpie), and very few scratches (and no cracks) on the clear face plate. |
|
| | | |
| |
If I had to guess, I would say that this tuner probably lived with a heavy smoker (the residue) in a smoggy city (corrosion) near the beach (rust), such as Los Angeles. Either that, or it went through a fire, but I don't think so because it doesn't smell like smoke, and the front face plate is in very nice shape. |
|
| | | |
| |
Fortunately too, when I plugged it in and turned it on, everything worked fine. The tuning is dead-on (although it may still benefit from an alignment) and all the LEDs and switches work. |
|
| | | |
| |
 |
| | | |
| |
I purchased a copy of the tuner's Service Guide on-line, and got to work. I dismantled the tuner as much as I could and carefully cleaned everything. I used alcohol to rub the sticky residue off of everything, except the clear face plate, and I used a wire brush to clean every screw, screw hole, or other surface that showed any rust or corrosion. I took off the face plate and cleaned the metal dial face, and both sides of the front face plate. I cleaned the top of the circuit board as best I could, and I scrubbed the bottom of the circuit board with a toothbrush and alcohol. By the time I was finished, it looked (almost) like new. |
|
| | | |
| |
The cover also had a lot of scratches on it, and the inside had rust around the screw holes. The outside paint had little bumps from where the metal under the paint was beginning to rust. I cleaned off the rust, and sanded the cover down to the bare metal. I primed it with spray metal primer, then sprayed it with several coats of black semi-gloss. Not exactly like new, but a lot better than it was. |
|
| | | |
| |
 |
| | | |
| |
On the circuit board, I replaced every electrolytic capacitor (27 total) with new ones. I used Panasonic FC capacitors for all but a few with very small values (two 0.47uF and one 0.22uF) that were not available in the FC line. I used the original values for all of the replacements, except for the two reservoir capacitors before the voltage regulator in the power supply. There I replaced the original two 470uF capacitors with two 1,000uF FCs. Including the 220uF capacitor after the voltage regulator, the power supply now has 2,220uF total, instead of 1,160uF. I also bypassed the large capacitors by soldering a 100nF film capacitor to the legs of one of the 1,000uF capacitors, and to the legs of the 220uF capacitor (the capacitors on either side of the voltage regulator). |
|
| | | |
| |
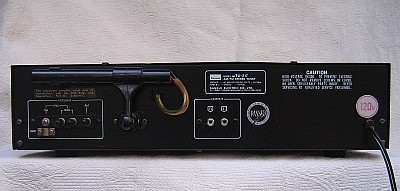
I also replaced the original two 10D1 rectifier diodes with new 1N4004s. As suggested on the Tuner Information Center's modifications pages, I put rubber grommets on the screws to isolate the transformer from the metal frame. I also cleaned the RCA jacks on the back, and the antenna connections, with very fine sandpaper. |
|
| | | |
| |
Now this tuner sounds excellent. Far superior to the cheapo Yamaha I was using. When I listen to the local classical station that has lots of power, and that broadcasts uncompressed, I can barely tell the difference between the radio and a CD. I can only image how good the higher-end Sansui tuners must sound. It gets more stations than the old Yamaha did, and (almost) always in stereo. It's a real gem, and so cool looking! |
|
| | | |
| |
Antennas |
|
| | | |
| |
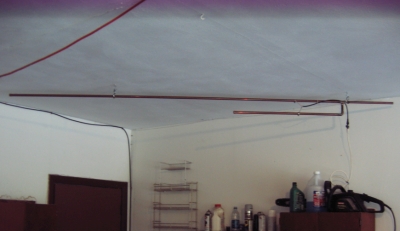
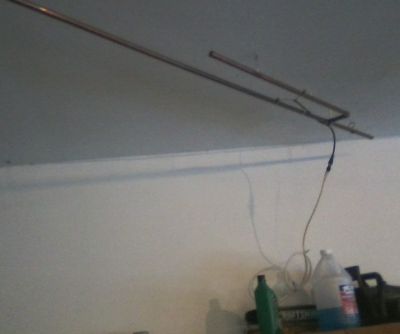
Over the years I have built and tried many types of antennas from articles on the web. None of them worked any better than the old wall-mounted, "T"-style, 300 ohm, single-cable antenna. That is, until I made a "J-Pole"-style antenna as shown below, hanging from my garage ceiling. |
|
| | | |
| |
 |
| | | |
| |
There are many sites on the web that describe how to design and build a J-Pole antenna. It isn't expensive, or hard, if you can solder copper pipe together. If you only listen to one station, or only one portion of the radio dial, you can maximize the reception by calculating the optimum lengths for the pipes for a given frequency. I listen to two stations, (99.5 MHz and 89.7 MHz), so I used a 7 foot pipe to cover both. You also need some 50 Ohm coaxial cable (like the kind used for TV cable), and a "balun" transformer that converts the signal from 50 Ohms to 300 Ohms (Radio Shack has them). The transformer is about four inches long, with a coaxial input plug, and twin U-shaped output connectors that connect to the 300 Ohm connectors on the back of the tuner. |
|
| | | |
| |
Note that the antenna runs cross-wise across the garage ceiling. It is crucial that you experiment with the orientation of the antenna, to find the position that provides the best reception. |
|
| | | |
| |
How does it work? The 99.5 MHz station comes in the same as with the T-antenna, but the 89.7 MHz station comes in twice as strong, and without the surging and hiss that came with the T-antenna. |
|
| | | |
| |
Note: After listening for several months, I noticed that the signal began surging again on certain days, especially when it was raining. I then read on a J-Pole web site that because the radio wave is propagated in the horizontal plane, the antenna must also be oriented in the horizontal plane. The next time the signal started surging on a rainy day, I rotated the antenna so that the long and short poles were oriented flat, as shown in the photo below. It completely stopped the surging, and it increased the signal strength by about 20%. |
|
| | | |
| |
 |
| | | |
| |
Back |
|


